Categories Blog

Leading-Edge vs. Trailing-Edge Dimmers

The installed base of domestic dimmers supports the almost ideal resistance exhibited by the impedance of an incandescent bulb. These devices are increasingly called upon to support LED replacement lamps, which offer challenges unanticipated by the designers of the dimmer systems, such as low current draw and very fast luminous response to minor power fluctuations. This blog highlights how dimmer type determines both the selection of damper and bleeder circuits in LED drivers, and the switching topology needed to optimize operation.

Phase-cut dimmers, either leading-edge or trailing-edge, make up the bulk of the dimmer market. After the input voltage rises following the zero crossing, leading edge dimmers inhibit for a period of time, controlling energy transferred to the lamp load and hence output brightness. Trailing-edge dimmers also regulate output by inhibiting for a period of time, however this is referenced to the negative going edge of the half-cycle.

Leading-edge dimmers are typically lower cost and so are more widely used whereas trailing–edge dimmers exhibit lower EMI and are preferred in some markets (notably Europe) and noise sensitive environments. That-being-said, it is unlikely that the average consumer will know whether their fixture is controlled by a leading-edge or a trailing-edge dimmer, and so it is important that LED replacement bulbs work with both types.


Figure 1. Simplified schematic of a leading-edge phase-cut dimmer (Including transient and surge suppression elements LS and CS)


Figure 2. Simplified schematic of a trailing-edge, phase-cut dimmer


Why shimmering and flickering occurs in leading-edge dimmers and why leading-edge and trailing-edge dimmers respond differently
In leading-edge phase-cut dimmers, the switching element is typically a TRIAC. Unlike BJTs or MOSFETs the TRIAC will latch-on once it is energized (after forward current exceeds latching current). It will continue to conduct until the forward current drops below a threshold (holding current). The TRIAC is protected against input voltage surges by a bypass capacitor CS and from high transient currents at switch-on by a series inductance (LS). The installed base of TRIAC dimmers in use today are designed to work with an almost ideal resistance (an incandescent bulb). The bulb presents a very-low impedance during turn-on, latching the TRIAC (IF>>IL) and once in conduction allows current to flow to zero crossing which holds the TRIAC in conduction (IF > IH) for almost the whole AC half-cycle. With no capacitive or inductive elements, the incandescent bulb does oscillate when presented with the voltage step of a dimmed AC sine wave. Because the TRIAC-dimmer/incandescent-bulb interface is not sensitive to the LS and CS values, the values of these components are not constrained and vary significantly between different leading-edge dimmer designs.

At turn-on, an LED load presents relatively high impedance, so input current may not be sufficient to latch the TRIAC dimmer. In order to insure that IL is achieved, a bleeder circuit is typically added to the LED driver input stage. In the simplest form, the bleeder is a simple RC combination that insures a pulse of current when the input voltage is applied.

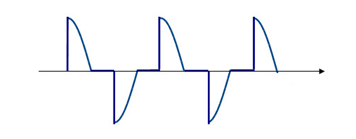
An LED lamp load does not exhibit incandescent-like pure resistance, and so, when presented with a step voltage the EMI filter and the bulk capacitance of the switching stage will cause an oscillation in the input current (IF) (see figure 3). The amplitude of the load ring is modulated by the surge protection capacitor CS, making the amplitude of the oscillation dependent on dimmer type.


Figure 3. Typical input current waveform for a power-factor-corrected dimmable bulb showing the oscillation caused by input current dropping below IH

To reduce the ring, a damper circuit is added – in its simplest form a series resistance to reduce the amplitude of oscillation at the expense of reduced efficiency (and therefore more heat for the LED bulb enclosure to manage).  The LED Bulb designer must add the smallest amount of damping impedance at the input stage of the LED that will allow the LED bulb to remain above the minimum holding current. Different leading-edge dimmers have different values for CS and LS which act to modify the current ring on the TRIAC. The TRIAC in each dimmer type will see more ringing than would be seen at the bulb due to LS. The designer must allow sufficient margin (give up efficiency) in the damper circuit to work with as many dimmers as practicable.

To further enhance damping, a bleeder is needed to compensate for, or mask the ringing below, the holding current. A simple RC bleeder is used across the input line or after the bridge rectifier. The bleeder is optimized with respect to the power rating of the LED driver. For lower power LED lamps higher bleed is required.

Trailing-edge dimmers present a different set of problems
The input voltage waveform from a trailing-edge dimmer is sinusoidal at the start of each half-line cycle. The MOSFET switch is driven by a controller which continually energizes the gate, making the dimmer less susceptible to current ringing.

However, the power supply in the LED will present a high impedance to the dimmer when the MOSFET switch is opened to cut power delivery. Trailing-edge dimmers require the input voltage of the LED driver to fall to zero each half-cycle to enable the dimmer controller to energize its own supply rails. This ensures that the zero-crossing detector will turn on the switch at the beginning of the next voltage half-line cycle. If there is insufficient impedance to bleed down the dimmers output voltage before the next AC cycle begins, then the dimmer may misfire causing shimmer and flicker.


Figure 4. For a trailing-edge dimmer if insufficient current is drawn to force a zero-crossing before the next half-line cycle, the dimmer may misfire, causing shimmer or flicker

Buck converters in particular have challenges when supporting trailing-edge dimmers. Buck converters are very popular for LED lamp drivers due to their high efficiency and low component count. For a buck topology, when the input voltage falls below the output voltage, the switching circuit cannot draw any power from the AC rail (and is therefore unable to bleed down the switch voltage). In contrast, buck-boost, tapped-buck and flyback converters can draw current for the entire switching cycle. For this reason, buck-boost converters and tapped-buck drivers with ICs, which switch through the whole line cycle as the LYTSwitch-4 from Power Integrations, can pull down the dimmer voltage after it turns off and are therefore better able to support trailing-edge dimmers.


Figure 5a. Buck Converter – Excellent with Leading-edge dimmers. MOSFET D-S is reverse biased when the input voltage drops below ~48 V. The passive bleeder (C8/R6) is required to provide the low impedance path between line-neutral to force zero crossing of the input voltage to work with trailing-edge dimmers.


Figure 5b. A Buck-boost converter continues switching (provides a low impedance) to the input when the input voltage has fallen below output voltage, making this topology more suitable for trailing-edge dimmers

Conclusion
Bleeder and damper circuits can be tuned to accommodate almost all leading-edge phase-cut dimmers. The designer trades off efficiency in order to achieve best possible dimmer compatibility but is not able to guarantee performance due to the variability of dimmer component values. Practical designs usually accommodate trailing-edge dimmers. In order to work with trailing-edge dimmers, further compromise on efficiency (large bleed current) or even a change in topology may be required in order to achieve acceptable dimmer compatibility in a given bulb design.

Categories Lighting

Reducing Flicker in LED Lighting

Nearly all AC-powered traditional light sources exhibit some degree of periodic modulation or flicker. Additionally, many traditional lighting sources produce a noticeable flicker as they near their end of life. Although desirable in some situations and not perceived equally by all people—both visible and non-visible flicker should be avoided, or at least minimized, in most lighting applications. Through its Cree Services Thermal, Electrical, Mechanical, Photometric and Optical (TEMPO) testing service, Cree has tested hundreds of SSL luminaires from streetlights to MR16 lamps to help characterize flicker and identify what levels of flicker are acceptable in certain situations, and how flicker can be minimized in LED lighting.

Metrics and Industry Standards
One of the greatest challenges with flicker is that an official industry standard does not exist to fully quantify the effects of flickering light sources. Visible flicker is usually noticed at frequencies below 100 Hz. The second volume of The Illuminating Engineer (1908) discusses the results of experiments to determine the “vanishing-flicker frequency” – the threshold where the effect is no longer observed. This is now known as the flicker fusion threshold or rate, and is influenced by six factors.

  1. Frequency of the light modulation
  2. Amplitude of the light modulation
  3. Average illumination intensity
  4. Wavelength
  5. Position on the retina at which stimulation occurs
  6. Degree of light or dark adaptation

According to the Illuminating Engineering Society (IES) RP 16 10 standard, percent flicker is a relative measure of the cyclic variation in the amplitude of a light source, and flicker index is a measure of the cyclic variation taking into account the shape of the waveform. The drawback to this method is that it addresses only two of the six factors previously mentioned. In addition, it assumes that a light source will always flicker at a fixed frequency and amplitude, and does not address random, erratic events that cause flicker, such as a sudden decrease in electrical current or voltage.

The ENERGY STAR requirement for lamps, due to go into effect Sept. 30, 2014, specifies that the highest percent flicker and highest flicker index be reported, but does not specify a maximum allowable limit for either.

Moreover, the Alliance for Solid-State Illumination System and Technologies (ASSIST)[1] defines flicker acceptability criteria based on their testing. Using the ASSIST criteria, at 100 Hz, percent flicker greater than 20 percent is unacceptable, and at 120 Hz, percent flicker greater than 30 percent is unacceptable.

Flicker in LED Lighting
Flicker is also nothing new with SSL. As a new technology, SSL is put under more scrutiny than the traditional light sources it is destined to replace, which is understandable after the many issues compact fluorescent lighting (CFL) had when it was first introduced to the market. Although our test results from a sample population of several SSL products show a wide range in flicker; a large majority of those products perform the same or better than other traditional light sources (to see the actual test results, read our white paper on flicker).

LED flicker characteristics are primarily a function of the LED driver. Most of the attention has focused on the ripple frequency that occurs on the output of the LED drivers, which is typically two times that of the input. For example, if the input voltage frequency is 60 Hz, the ripple frequency is 120 Hz. The light output of an LED correlates closely with the output waveform of its driver.[2] Figure 1 shows a waveform of the ripple current from a driver. Figure 2 shows the resulting waveform of the light output of an LED connected to the driver.[3] In this example, the driver ripple current fluctuates 46 percent and the resulting percent flicker of the LED is 36 percent.


Figure 1. Driver output ripple current


Figure 2. Measured Light Output


Flicker is also present with pulse width modulation (PWM), a technique commonly used to dim LEDs. Figure 3 shows the flicker index versus duty cycle for a square wave at three different modulation percentages. The worst case flicker index, with the value approaching 1.0, would be for a light that flashes in short, low frequency bursts.


Figure 3. Flicker index for square wave


Solutions to Flicker
A well-designed driver can reduce the perceived flicker produced by an SSL luminaire. If designing a custom driver for a luminaire, capacitance should be added to the output of the driver to filter out the AC ripple component; however, this comes with the trade-off of potentially decreasing system reliability, especially if low-quality capacitors are used. In many applications, such as replacement lamps, it may not be possible to add sufficient capacitance because of physical space constraints.

If a luminaire designer chooses to use a commercially available (i.e. off-the-shelf) driver, a driver that minimizes the amount of driver ripple current should be selected. If information on the percent ripple is not provided, it is important for a designer to get this data from the driver manufacturer before making a selection.

One cause of flickering is compatibility issues with dimming and control circuitry. It is important to specify and verify that the products are indeed compatible with the dimmers or other control circuits used in the lighting system. Problems can be caused by a faulty photosensor or timer.

Furthermore, random, intermittent flickering could be an indication of some other problem in the lighting system such as loose wiring and interconnections. Problems with the quality of the electrical supply can also result in power fluctuations. If those causes are suspected, it is important to investigate further to prevent any potential safety hazards.

Flicker index and percent flicker are typically not listed in product datasheets or labeling. Until they are, it is critical for the lighting designer to either obtain this information from the luminaire manufacturer or conduct luminaire testing to measure flicker directly.

Categories Blog

One Shade of Grey

HB-LED manufacturers do not sell bare die. There are several reasons for this, not least being that they are too small to be of any use except, perhaps, as a substitute for pepper in overpriced restaurants.  The solution that has evolved uses ceramic tiles called sub-mounts. The die is attached to one side of the tile with all necessary electrical connections made and a small lens is popped on top. On the underside of the tile are provided solder pads, connected to the die by vias. The solder pads permit the sub-mount and hence the HB-LED, to be attached to a PCB just like any other surface mount component.

Alumina is the ceramic of choice for LED sub-mounts. It is cheap, easy to drill and metallise, and has reasonable thermal conductivity (20-30 W/mK). It is also white. This improves luminaire efficiency by reflecting itinerant photons to beneficial directions.

Due to technical advances, HB-LED die are getting smaller and brighter. These two trends mean that both the amount of heat and the heat flux (W/mm2) produced by HB-LEDs is increasing. And LEDs do not like it hot. High temperatures reduce life, degrade the light quality and decrease the efficiency of light production which, incidentally, causes the LEDs to run hotter still.  But, as the power rating and power density of HB-LEDs climbs, alumina is unable to remove the heat fast enough. This has forced the industry to switch to aluminium nitride ceramic and caused sleepless nights for many an engineer and purchasing manager.

Aluminium nitride makes an excellent sub-mount for HB-LEDs on just one criteria; its thermal conductivity is nearly six times improved at 160 W/mK. But, it is much more difficult to manufacture and process, resulting in a price premium roughly 10 times alumina! And, to cap it all, aluminium nitride is available in precisely one color. Grey. Despite all the disadvantages, the need for high thermal conductivity sub-mounts has resulted in such a wholesale switch from alumina to aluminium nitride that the supply side is close to capacity. This means future pricing is going in one direction only.

Next-generation HB-LEDs will need sub-mounts with even greater thermal conductivity. Beryllium oxide would fulfill the need (330 W/mK), were it not for the minor annoyances that it is 10 times the price of aluminium nitride and ever so slightly toxic. Time for some lateral thinking.

Metals, like aluminium, are really good thermal conductors (205 W/mk) and readily available as thin, flat, sheets. However you can’t put circuits directly on a metal tile because everything would short. The solution is a dielectric surface coating and ceramics, like alumina, are excellent dielectrics. So, the ideal sub-mount for an HB-LED is a thick metal core to provide the thermal conductivity with a thin ceramic coating to provide the electrical isolation. Provided the ceramic coating is thin the thermal resistance of the layer will be negligible. Aluminium can be converted to Nanoceramic alumina in an electrochemical cell. The conversion can even be done on the sidewalls of holes making possible formation of vias. The result is a mechanically robust sub-mount, with thermal conductivity close to the best aluminium nitride available, but at a fraction of the cost and with no supply chain constraints. It should be no surprise that HB-LED manufacturers are busy tooling-up to use this new material.

While Nanoceramic has the interesting property that means the color can be tailored from white to black, there is no truth to the rumor that it can be purchased in 50 shades of grey to suit the intended disposition of the luminaire.